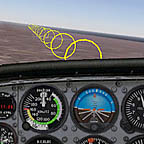
The Visual Flight Path makes it easier to fly a selected VOR radial or instrument landing system (ILS) approach. The Path puts a "follow me" display in the sky. To stay on course, just follow the display. The Visual Flight Path is especially useful when you're trying to learn the relationship between the VOR needles in your cockpit and the path to the VOR station.
The Visual Flight Path displays a variety of visual shapes for you to follow. You can lock the Path to an ILS or VOR signal, and select the spacing and density of the path that Flight Simulator displays on the window.
Activating the Visual Flight Path
You must have the Visual Flight Path enabled to see the display in the sky.
To activate Visual Flight Path
|
Linking Visual Flight Path to Navigational Aids
You must have a VOR or ILS tuned into one of your radios in order to see the Visual Flight Path when selecting this option.
To lock the Visual Flight Path to a VOR or ILS
|
Setting Visual Flight Path Shape
Use the Guide Shape list to choose the type of display you want: Rectangles, Telephone poles, Hoops, or Yellow brick road.
To choose how you want the Path to display
|
Setting Visual Flight Path Density
You can choose how densely Flight Simulator places the guides along your path.
To set the Visual Flight Path density
|
Setting Visual Flight Path Spacing
You can choose how far apart Flight Simulator will place guides along your path.
To set the Visual Flight Path spacing
|
Plotting an Intercept Course
You can have the Visual Flight Path draw an intercepting path to the radial or final approach course that you have set on the Omni Bearing Selector of a VOR or ILS.
To plot an intercepting path
|
Setting Guide Altitude
You can set the altitude at which the guides appear. If the Visual Flight Path is linked to an ILS, the Path will follow the glide slope on the approach phase of the flight.
To set the guide altitude
|