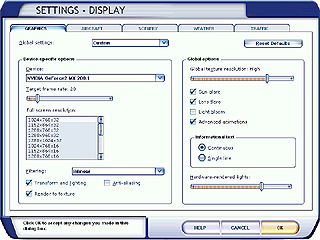
The Display Settings dialog box includes five tabs: Graphics, Aircraft, Scenery, Weather, and Traffic. The Graphics tab contains settings that affect the way your computer processes graphics in Flight Simulator.
When you installed Flight Simulator, the setup program automatically chose the best overall graphics settings for your computer's hardware. The Graphics Settings tab in the Display Settings dialog box lets you customize Flight Simulator to look and perform the way you want it to. You may want to display higher detail in airports and cities, or you may want greater definition in mountains and valleys. You can also choose whether to display special effects and shadows.
Depending on your computer, display settings may affect the performance of Flight Simulator. Experiment with the settings to find the combination of performance and appearance that you like best.
Overall Graphics Settings
Use the Global settings list to control the graphics quality. The choice you make in this list box affects the settings in the rest of this dialog box. Selecting graphics settings individually sets the Global settings to Custom.
|
To open the Graphics settings tab
|
Device-specific Options
Depending on your system, adjusting the hardware settings may provide better graphics appearance or better system performance when running Flight Simulator.
Device Name
Some computer systems are equipped with more than one video graphics card; select the card that provides the best performance. You must run Flight Simulator in full-screen mode to take advantage of a 3-D graphics accelerator card.
|
To select a different video graphics card
|
Target Frame Rate
In a movie theater, the film generally runs past the projector's lens at a rate of 24 frames per second. At this speed, the human eye cannot detect the fact that the film is actually a series of rapidly changing still pictures. Like a movie, animated graphics are rendered on a computer screen one frame at a time. This happens at a high frame rate so it seems like a constantly moving picture.
For some computers, it may be advantageous to limit the target frame rate. By limiting the upper end of the frame rate, the computer doesn't spend any more resources than necessary to render the selected frame rate. Resources not used to increase the frame rate beyond that setting can be used for other tasks like rendering clouds or drawing scenery in the distance. Experiment to find the frame rate that works best for you.
|
To set a target frame rate
|
Available Display Resolutions
A computer screen is made up of tiny dots called pixels. The more pixels used to draw an image on screen, the higher its display resolution and the more detail visible.
The numbers in the Full screen resolution list indicate the number of pixels displayed as well as the depth of color. For example, 1024 x 768 x 32 refers to 1024 pixels x 768 pixels x 32 million colors. A setting of 1280 x 720 x 32 will show more detail than a setting of 1024 x 768 x 32, and objects on the screen will also appear smaller. These settings only affect the display when running Flight Simulator in full-screen mode, not in windowed mode. For more about screen modes, see Using Views and Windows.
Only the resolutions supported by your video card will be displayed in the list. Experiment with resolutions to find the one that works best for you.
|
To select a display resolution
|
Filtering
Filtering makes textures appear less blocky. When no filtering is selected, every pixel in the graphics textures appears as a square, which may improve performance on some computers. If you're having performance problems, try selecting None in the Filtering list.
Bilinear filtering samples the textures better than no filtering but may introduce flickering in the distance or on edges with textures.
Trilinear filtering is a higher level of texture filtering and reduces flickering considerably, but not all graphics cards can handle this option correctly. The difference between bilinear and trilinear filtering is most noticeable when you're moving in Flight Simulator.
Anisotropic filtering is the highest level of texture filtering, yielding a smoother image.
|
To improve the appearance of textures
|
Anti-aliasing
Selecting anti-aliasing removes jagged edges on terrain and objects but may reduce performance on some computers.
|
To smooth the edges of terrain and objects
|
Global Options
Global texture resolution
You can adjust the level of resolution for ground and water textures in the Flight Simulator world. Higher settings may decrease performance depending on the capabilities of your 3-D graphics card. Experiment with this setting to get the best balance between graphics quality and system performance.
|
To adjust global texture resolution
|
Sun Glare
When the sun comes into direct view, the glare causes an effect of washing out other objects in view.
|
To simulate sun glare
|
Lens Flare
When the sun comes into direct view, the glare causes streaks of light called lens flare (like what you see when shooting a camera into bright light).
|
To simulate lens flare
|
Light Bloom
Objects in direct sunlight are subject to exposure effects, making them look washed out.
|
To simulate light bloom
|
Advanced Animations
Flight Simulator has a living world, alive with animated people, animals, and vechicles. The Advanced animations feature controls turning the advanced animations on and off. In addition to people and animals, the advanced animations include wing-flex, the ability of an aircraft wing to flex when the aircraft is in turbulence or when it is maneuvering.
|
To enable advanced animations
|
Informational Text
Some types of messages are displayed onscreen when you fly, such as the Airport Terminal Information Service. You can choose to display these messages as blocks of text or as a scrolling ticker across the screen.
|
To choose the method of displaying messages
|
Resetting Default Values
You can easily return to the default display settings at any time.
|
To reset the display settings on any tab
|